Thursday 1 April 2010

Recent Works

Just a few images of my recent works.


Friday 12 March 2010

Scots Are Frugal,Not Mean

At first glance this might seem like just another ordinary bench grinder.Well,that is exactly what it is.In fact,this particular grinder is considerably simpler in structure than the machine I pulled out of the box.
Both tool rests & cowls have been removed,the coarse left hand wheel has been replaced by the finer right hand & the right hand spindle is left bare for attaching various accessories,faceplates for turning,sanding discs & my version of a jewellers texturing or Fibral mop.

It was reading the latest blog entry of Nick Carter http://mechanicalphilosopher.blogspot.com/ on making your own abrasive buffing wheels for the Dremel that led me to publishing this post about my grinder & specifically my abrasive wheels.

Since I started working silver in earnest I have always prefered a matt or brushed finish,for me the form of an object can be lost if the surface is too shiny,you can't see the true shape.Not always but most of the time.I found that the quickest & easiest way to achieve this finish was to use one of these...Fantastic piece of kit,readily available,works on wood,metal,bone,only £4-6 each & fits directly onto the spindle of the grinder.
But wait....

5 years or so ago whilst enjoying an excursion to http://www.billstoolstore.co.uk/ I discovered packs of 10 of the same material in rectangular sheet form,225mm x 145mm for the bargain price of £2.50.I knew all I needed was to make a simple mandrel to extend the M12 threaded nose of my grinder & for £7.50,the price of 3 packs,I would have 60 individual Fibral-like discs that could be sandwiched together to create 10 complete mops!

Ludicrous bargain!!!

Since then I have discovered the Chinese supermarket round the corner sells the exact same abrasive pads for an even more pocket friendly £2!!!

Inflation,where?????

I'll finish this post with a few images of me renewing a worn out mop.


Monday 1 March 2010

Shoulder Plane

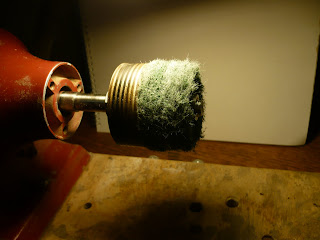
After much ado here is my Boxwood,Blackwood,Mopane & Lignum Vitae shoulder plane.

I intended to make this plane 15mm wide but a moments distraction on the sander resulted in a width of 14.6mm,not a huge deal but enough to unleash some spectacularly colourful language & a small but steady stream of self flagellation.

She is constructed with slabs of Boxwood over a Mopane core with the Lignum Vitae sole rebated down the center to accept the Mopane & the Blackwood border is dovetailed into the ends.The blade is 3mm 0-1 tool steel honed to a single bevel of 25 degrees & the bed is angled at 28 degrees.

Like many of my projects she was started over a year ago,possibly close to 2,but I was put off completing her by how flexible she was once I had opened her mouth up.

However,I saw her sitting on the shelf this morning & thought,

"Hey,let's see if I can get her to make shavings..."

A couple of hours later,a new blade,cut,ground & heat treated,a wedge out of Lignum,cut & fitted & lo & behold the Mahogany shavings surrounding her are evidence of her worthiness.

Her blade is ground a whisper wider than her body,about 1/5th of a millimeter & she is 61mm high & 107.5mm long.

Although I'm satisfied with her performance I will be making subsequent planes with slightly smaller cut outs in their bodies to reduce some of that flexibility.

I've called her Bethsheby after one of Karens ancestors & one of the kittens we had to return because of my accursed alergies.

Sunday 24 January 2010

Travel Carving Tool


This post features my prototype Bocote,brass,stainless,mild & high carbon tool steel,travel carving tool.The tip of this tool is interchangeable thanks to a clutch mechanism that locks the cutting tip in place.This allows many different tips to be carried in a relatively small space,say a leather wallet & the handle may simply be stowed in a pocket.


I am 95% happy with how it turned out,just a minor tweak to sort out repeatable blade alignment but all in all it's almost retail ready.

Thursday 21 January 2010

Hand tool versus Power tool,Tradition versus Progression

To my mind the hand tool versus power tool debate is primarily about control & involvement.

Many power tools remove that involvement,once you set them up it's simply a matter of feeding your timber through so there's more involvement with the machine than the timber.If you are a professional woodworker who relies on speedy production so that you may eat then chances are that you will be won over by the most efficient way to complete any said task,this usually means some form of powertooling.

Of course,there are some professionals who market their work as handmade with handtools & are fortunate enough to thrive doing this but I suspect that they are in the minority.

If you are a hobby,or escapist,woodworker then chances are you want to be more involved with the wood,to have a more therapeutic experience.This involves using not only the hands but also the eyes & the ears,well actually,the whole body(should we call them bodytools then?).You know when a plane is correctly set by the feel of that first shaving & the sound it makes as it is peeled from the surface(hiss-swoosh).

When I think about the hand tool versus power tool debate it makes me think about the past & the future,tradition versus progression.

Being self taught I am not what could be called a traditional craftsman.In fact I eschew the very term "traditional" & prefer "proven",it's a semantic quibble but I feel an important one.

The term traditional means to me"the way it was done by our progenitors".

Now,I'm sure our progenitors were sensible people,the course of technological history has proven that.I just wonder at what point did people start to look to the past in a more favourable way than the present?In my opinion a belief that things were done better in the past negates the possibility of advancement & that just doesn't make sense.Of course it would be utter foolishness to ignore the past,it is a treasure trove of ingenuity & invention but it doesn't hold all the answers simply because all the questions haven't been asked yet.There are techniques that work but I believe in finding a way to make things work better.

I have no time for romance in woodworking,I have no time for tradition for its own sake.

"Without deviation from the norm, progress is not possible."
Frank Zappa US musician, singer, & songwriter (1940 - 1993)

Monday 18 January 2010

Focusing

I have decided that I need more discipline & with that in mind I am going to start & finish at least 1 item per day,be it pendant,cufflinks,earrings,small box,etc.

My usual script is to work on a large number of items at once,drill a hole in a pendant then do the metalwork on a set of cufflinks then apply finish to a box,I am usually actively working on more than 30 things within a 1 week period.Because of this fact a large number of items tend to take months,even years to complete (not very lucrative!!!)as I am always starting new & exciting projects & "forgetting" about older ones.I'll still be doing this,I enjoy flitting from project to project but I need to have "production".

I am also going to make at least 1 mushroom a day to keep my skills honed & also to sell.I haven't sold my wooden mushrooms for years,but if I am going to be making them for practise it won't be long before our house is overrun with the little,pointy blighters.

Starting price will be £2 for a 40mm or 1.5 inch tall version & will increase in price depending on which wood I use & what size they are.Not more than £5 or much bigger than 70mm 0r 2.75 inches tall.

Saturday 16 January 2010

Mahogany Mushroom

In the first video I will show how I prepare a piece of square section Mahogany to be turned into a mushroom.
First of all I round & taper one end on a sanding disc then turn a corresponding socket in a Birch ply faceplate then glue the Mahogany into the socket with medium viscosity cyanoacrylate.I would normaly use the thicker CA as it has better gap filling properties but the shop was out & medium is sufficient if not ideal.I warn you to be very,very,very careful with THIN viscosity CA,it is incredibly fluid & can give a nasty burn if spilled onto skin.
The sanding disc has 80 grit paper PVA glued to a Birch ply faceplate.
The turning tool is a 2.5mm square graver that is sharpened like a parting tool on one end & like a round scraper on the other.It has a friction fit into the mahogany handle & is easilly swapped end to end when required.
You will notice that I sprinkle some dust onto the base of the blank after gluing.This is to soak up any spare CA making the bond stronger & it also speeds up the curing time.
I will usually leave the blank for a minute or so to cure but Mahogany seems to react slightly with CA making it take a little longer to set.

http://www.youtube.com/user/ajbbbt#p/a/u/0/Jmus9Dq5yOc


The second video is of me turning the actual mushroom.
I must confess,I didn't use the Mahogany blank I mounted in the previous clip as that one took me a tad over 10 minutes to turn & I didn't realise that Youtube has a 10 minute limit for videos.I'm actually happier with this mushroom though,only took 7.5 minutes to turn & is a slightly better shape than the first.
As well as the 2.5mm graver I used to mount the blank I also used a 1/4 inch spindle gouge sharpened to a ladies fingernail profile.I parted the mushroom with a piercing saw fitted with a 3/0 blade.
Much of my work is finished to 600 grit then given a wipe with good old petroleum jelly.Not the most durable finish in the world but it is easy to reapply & allows the true texture & warmth of wood to shine through.

http://www.youtube.com/user/ajbbbt#p/a/u/0/3D1jEsj3w58


I need to have a word with the director & lighting technician of the video as neither of them seem to have much of a clue...


Here's a pic of the finished article.